Growing Tomatoes from Seeds

Choosing Tomato Varieties

We have a vast collection of tomato seeds ready for starting.  We also have a beginning assortment of tomato starts in our bedding department.

Tomatoes group nicely into types according to growth habit and production.

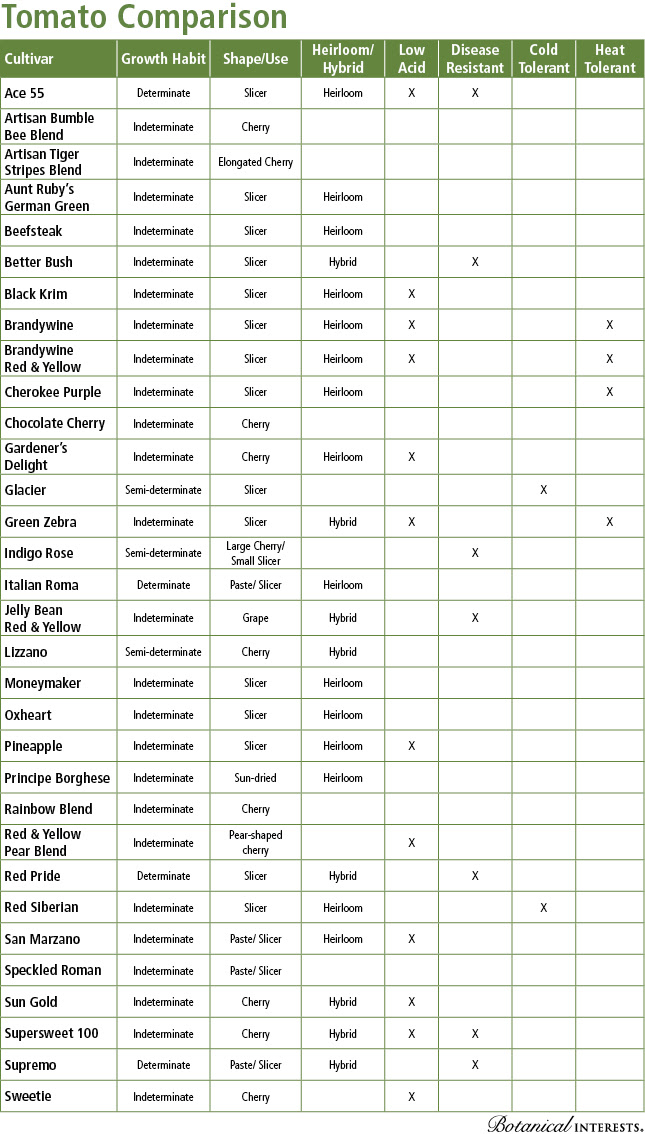
Determinate types grow in a compact, bush form, requiring little or no staking. Fruit forms on the ends of the branches; most of the crop ripens at the same time. One or more successive plantings will ensure an extended harvest period. Determinate types are often the choice of those who want a large supply of ripe fruit at once for canning. Determinate types include Ace 55 and Italian Roma.

Indeterminate varieties continue to grow and produce fruit all season until the first frost. Tomatoes in all stages of development may be on the plants at one time. The plants set fruit clusters along a vigorously growing vining stem. Under optimum conditions, some can grow over 15′, but in most home gardens they reach about 6′. Some indeterminates have a bush form with stockier vines, which set fruit clusters closer together. Indeterminate types include Beefsteak, most cherry tomatoes, and San Marzano (paste).

Semi-determinate tomatoes also continue to produce up until frost. A good one to consider is Glacier.

Tomatoes can also be also grouped by use, shape, and size.

For slicing, use tomatoes that are large and juicy.

Paste (sauce/Roma/plum) tomatoes are drier (concentrated flavor), with fewer seeds, making them ideal for a sauce but also excellent for slicing.

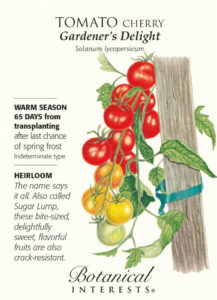
Cherry tomatoes are bite-sized and come in several shapes like oblong, pear-shaped or round.

Lily of the Valley – Popular Plant for a Woodland Shade Garden

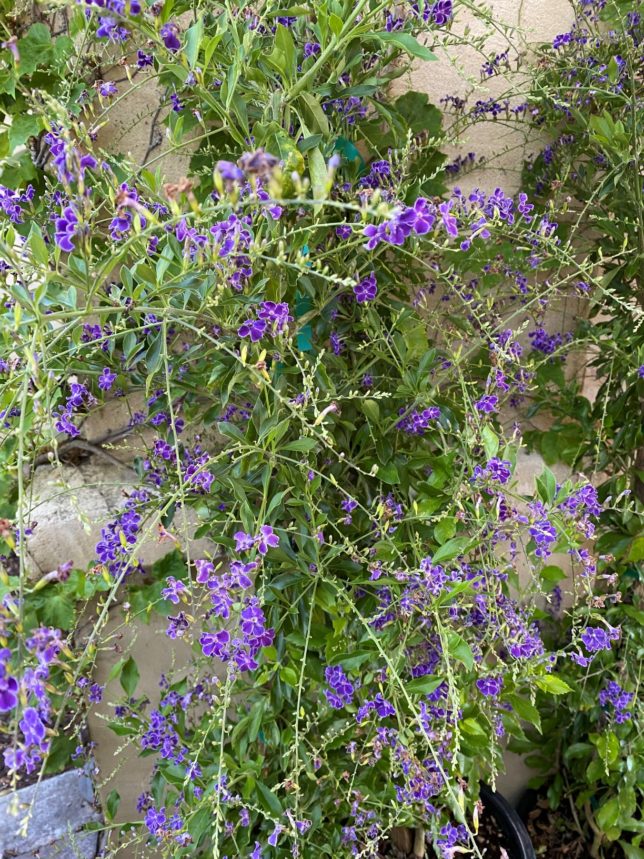
Tiny, bell-shaped flower clusters of “Lily of the Valley” are in demand. Select yours early, these often come into the nursery and are sold out before some gardeners even have a chance to pick some up.

Growing in woodlands through Europe and Asia, they are charming and fragrant. Lily of the valley was featured in the bridal bouquet at the wedding of Prince William and Catherine Middleton.

The “pips,” like bulbs, are baby root sections of this fragrant favorite grow so well, they often bloom before they are planted.

Give Lily of the Valley pips water and provide some warmth and light and these cuties will sprout and bloom within just 3 or 4 short weeks. Lily of the Valley grows best in woodland conditions, same as fairies: fertile, humus-rich, moist soil and partial to full shade.

Enjoy their fragrant bloom again year after year. Be careful when situating this plant – though it may take a while to get started, this Lily of the Valley will spread rapidly, forming a dense, weed-smothering ground cover. Plant out in the yard, and watch them multiply before they bloom in increasing numbers next spring! Plant with care if you have small children or curious pets.  All parts of the plant are toxic.

Lily of the Valley benefits from annual mulching of acid planting mix.

Tips for Planting in Summer

DSCF9355Plants planted in the heat of summer are more prone to pitfalls than any other time of the year but you can avoid some common problems and keep your plants healthy and happy despite our Valley heat and the drought by using the checklist below:

Water in the pot before planting
Setting a nursery pot into a tub of water until the bubbles stop is the surest way to know your plant is completely watered before setting it into the pre-moistened planting hole.

Plant Soon
Plant your new plant as soon as is practical (better to postpone planting a few days if the weather is extremely hot.) If you can’t plant it right away, keep your new plants in a shady location and keep their roots moist.

Monitor Frequently
Check in on your new plants frequently. Water deeply and check every day. Taking the time daily to look at the plants and feel the root ball for moisture will provide clues that will help your new plants survive a heat spell.

Mulch
Adding mulch around the plants will conserve up to 30% water.   Don’t pile the mulch against the plant, but surround the plant and extend out  from the plant 18-36″

Wait Until After Vacation
Postpone your whole planting project if you are scheduled for a vacation during the hot months. Better to purchase new plants after your return than see them burn up by a sudden rise in temperatures while you are away.

Proper Planting Depth
When planting any new plants avoid the temptation to bury it deeper than it was growing in the nursery container. Except in the case of tomatoes, virtually every plant will die within a year if new soil is placed on top of the original root ball. See our online planting instructions for an illustration.

Water by Hand
Don’t rely on an automatic drip or spray system to keep plants at their best their first few weeks.  Hand watering is more targeted, saves water and allows you to monitor plants closely

Evaluate Drip System
Make sure you evaluate how your drip system is working, make repairs. Drip systems can make it difficult to detect a problem until it’s too late. Turn the system on and look at every emitter to be sure its functioning and look for leaks.

Add More Drip Emitters
Add drip emitters to supply your plant’s growing root system. A typical shrub will need water all around it to thrive. A tree by all means will require several drip emitters. (One drip emitter on an older tree will almost certainly result in a small root system that will not support the tree in a vertical position long term).

Don’t Fertilize a Thirsty Plant
For new or established landscapes, avoid fertilizing a thirsty plant. Typical fertilizers, even blood meal can burn on a hot day. Thoroughly water one day and fertilize the next day using a mild fertilizer such as EB Stone Organics or Maxsea water soluble.

Call us with Questions
Of course, this checklist is generalized and brief, but as summer weather hits, please call or come in with any specific questions or concerns you have about yellowing leaves, wilty symptoms or whatever. Often we can reverse a decline with some evaluation and advice. Think of us as partners. We are interested in your success. (925) 447-0280.

Daisies of Summer

Daisy-like flowers are a frequent and welcome sight in summer . . . they adorn a number of plants of different sizes, shapes, and colors. Some are great as cut flowers and others make wonderful accents in the garden. Here are some familiar and not-so-familiar favorites:

Shasta Daisy – High on the list for outstanding cut flowers in summer is the Shasta Daisy. This one to three-foot-tall perennial is a hardy grower and prolific bloomer all summer long. The flowers, in most cases, have white petals with golden centers. They prefer a moist, well-drained location that gets more sun than shade. Water regularly and feed with Maxsea Bloom Formula to encourage large flowers and prolonged bloom. Keep the old blooms snipped to keep those flowers coming through the summer.

Gloriosa DaisyFor those who prefer earthy colors, there is the Gloriosa Daisy or Black-Eyed Susan. This hot sun lover reaches 4 feet high with 4-6 inch blooms in yellow, orange, mahogany, maroon and stripes. They bloom summer through fall, and most have the traditional black center.

Osteospermum – This profuse bloomer is otherwise known as the African Daisy. Comes in a wide range of bright colors including purple, yellow and orange. Loves sun and regular water. Will bloom spring through fall.

Santa Barbara DaisyOne of the easiest daisies to grow, and very water-wise. Adds sparkle to the flower garden, usually grows about 12″ high and 18″ wide.

Late Summer Garden Color

There are many garden flowers ready to turn even the most unsightly bare spots into a bright, colorful oasis. Spruce up your sunny flower beds with these options.
August flower beds often suffer something of an identity crisis. Many of the annuals we planted early in the year are past their prime. But, while it’s a hot and dry time of the year, it’s not too late for planting some late-summer garden color.
There are many garden flowers ready to turn even the most unsightly bare spots into a bright, colorful oasis. Spruce up your sunny flower beds with these options.
Low – 4-6.”

alyssum - summer garden color
Alyssum

Medium – 8-10″

marigolds, petunias and vinca flowers - summer garden color

Tall 18″+

cosmos, zinnias and snap dragons

Except for the zinnias, all of the above will do well in half sun, half shade. Begonias will also brighten any spot that gets a full morning of sun or shade. Remember that you can create living bouquets with these annuals. All but the Vinca would also benefit from the addition of Soil Moist Granules which cut the water needs by half.

What is Blooming Now?

Here are a few pictures of plants showing color in the nursery this week.

Jacaranda

Clematis

Abutilon

Duranta Geisha Girl

Hydrangeas

Hibiscus (bushes & trees)

We still have a gorgeous selection of roses available in a rainbow of colors!

Getting Roses off to a Great Start

Now that your roses are budding and ready to reward you with their glorious blooms, it is time to get a care plan in place to sustain them all season.

Insects

With the warmer, sunny days also come insects, keep an eye on new growth and watch for infestations of aphids, these insects are usually light green in color and cluster on new growth and buds. They can be hosed off with a strong jet of water which renders them unable to feed or spray with Bonide All Seasons Oil which will smother them. Follow up in a week or two with a release of live Ladybugs, they are voracious feeders and will devour any new hatchlings.

Fungus Diseases

Powdery Mildew is a dusty looking white powder spread across leaves and stems. Rust will cause yellowing leaves and orange pustules that rub off easily on the undersides of leaves. Blackspot will also cause yellowing with black spots on leaves that fall off easily. If you notice any of these symptoms, it is best to act quickly with fungicide sprays like Bonide Copper Fungicide or Neem Oil. Also, clean up any leaf litter from around the plant and remove infected leaves from the plant.

With a little bit of loving care, you’re on your way to a rich reward of blooms all season.

Fertilizing

Fertilizing will get your roses thriving for a sustained blooming period.

How you water – sprinkler vs. drip vs. hand/hose will determine what type of fertilizer you use. If you have a drip irrigation system on your roses, you will need to use a liquid or water soluble fertilizer like Maxsea 16-16-16 or Master Nursery Liquid Gold 15-6-3. Both of these are concentrates that are diluted with water and watered in.  Always remember to water your plants the day before fertilizing.

If you have a sprinkler system or hand water you can use granular products like E.B. Stone Organic Rose & Flower Food 5-6-3 or Master Nursery Rose and Flower Food 5-10-5, again remember to always water the day before and water your fertilizer in well.


Happy Wanderer – Vine Lilac

The Happy Wanderer Vine Lilac is making quite a show of itself, blooming in the nursery right now. It is a beautiful, climbing vine with some winning attributes; it is drought tolerant, winter-blooming and evergreen, to name a few.

It’s the cascade of purple blooms brightening the garden in late winter and early spring that makes this vine stand out most. Few other plants are blooming at this time, and this one looks fabulous!

An Australian native, growing to about 10′ Happy Wanderer Vine Lilac can handle both sun and bright shade. It is hardy to about 20 degrees and at 10 ft. It won’t get out of hand.  It is perfect for climbing up a small structure such as an obelisk, or tumbling out of a large container. It has been successfully grown over a small arbor as well. It also grows beautifully as a bank cover by pinning the branches down. Did we mention it’s evergreen? What’s not to like about this beauty?

Plant and enjoy now, then cut back after bloom to prevent tangling.


Dahlias are Showing Off

Dahlias are beautiful because they are bright and often very large and have the added benefit of attracting pollinators. They also have a long blooming season and make an ideal, long-lasting cut flower. We have tubers now.

This beautiful sun-loving perennial bloomer is the official flower of the City of Seattle and also the national flower of Mexico. We have sought out Dahlias in a wide variety of heights and forms to suit any garden or landscaping theme.

Plant large dahlias 3 to 4 feet apart; plant smaller dahlias 2 feet apart — plant dahlias in full or morning sun in soil that drains well. Select tubers now and plant them as the ground begins to warm in spring (store in a cool spot until ready).

Planting

Dig a big hole, 8-10″ deep and improve the soil with a generous amount of Gold Rush soil amendment. Add and mix in Master Nursery Bone Meal in the bottom of the hole and plant the bulb (actually a tuber) on their side, 4″ deep with the cut stem, if visible facing up. Nurture them with water and an additional feeding of Rose & Flower Food as the buds form in summer and also feed monthly through September. Watch for a spectacular summer display that will continue right into fall.

Water in and then only water when you see leaves emerge. Dahlias then appreciate moderate watering, which should look like a nice thorough soaking 2 to 3 times a week after the weather warms.

For best appearance and to keep the blooms coming, snip off the faded blossoms.

In fall, many gardeners dig up their dahlia tubers to store in a cool, dry spot for winter. We are in a mild winter region, so ours planted here at the nursery bloom year after year without lifting and storing.


Dahlia Tubers Now In Stock

Spring bulbs are here now and more are coming in the weeks ahead. These include corms, tubers, and rhizomes for most of the summer blooming flowers such as gladiolus and dahlias.

Dahlias are beautiful because they are bright and often very large and have the added benefit of attracting pollinators. They also have a long blooming season and make an ideal, long-lasting cut flower. 

This beautiful sun-loving perennial bloomer is the official flower of the City of Seattle and also the national flower of Mexico. We have sought out Dahlias in a wide variety of heights and forms to suit any garden or landscaping theme.

Plant large dahlias 3 to 4 feet apart; plant smaller dahlias 2 feet apart. Plant dahlias in a spot in the garden with full sun or morning sun. Give them soil that drains well. Select tubers now and plant them as the ground begins to warm in spring (store in a cool spot until ready).

Planting

Dig a big hole, 8-10″ deep and improve the soil with a generous amount of Gold Rush soil amendment. Add and mix in Master Nursery Bone Meal in the bottom of the hole and plant the bulb (actually a tuber) on their side, 4″ deep with the cut stem, if visible facing up. Nurture them with water and an additional feeding of Rose & Flower Food as the buds form in summer and also feed monthly through September. Watch for a spectacular summer display that will continue right into fall.

Water in and then only water when you see leaves emerge. Dahlias then appreciate moderate watering, which should look like a nice thorough soaking 2 to 3 times a week after the weather warms.

For best appearance and to keep the blooms coming, snip off the faded blossoms.

In fall, many gardeners dig up their dahlia tubers to store in a cool, dry spot for winter. We are in a mild winter region, so ours planted here at the nursery bloom year after year without lifting and storing.